JK Coupons

Web Hosting Coupons & Offers

Skip to content
  • Home
  • Stores
  • Categories
  • Blog
  • HOT Deals
  • Reviews
    • Hostinger Review
    • ChemiCloud Review
    • Zyro Website Builder Review
  • Black Friday
    • ChemiCloud Black Friday Sale
    • Hostinger Black Friday Sale
    • Liquid Web Black Friday Sale
    • Nexcess Black Friday Sale 2024
Install WordPress in Godaddy cPanel

How to Install WordPress on Godaddy cPanel Manually

Here you will find the step by step guidelines for installing a WordPress on Godaddy cPanel. Just follow the below mentioned steps.

Step 1: Purchase Domain name and Hosting from Godaddy.(Click to Purchase)

Step 2: Login to Godaddy Account.

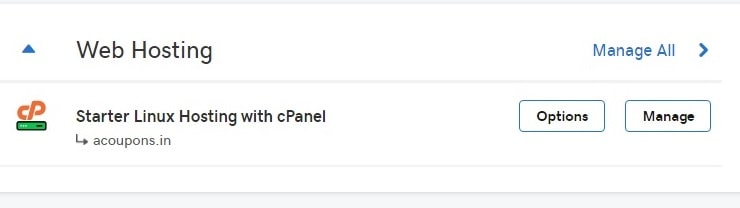
Step 3: Click on “Manage” under Web Hosting Section.

Step 4: Click on “cPanel Admin”

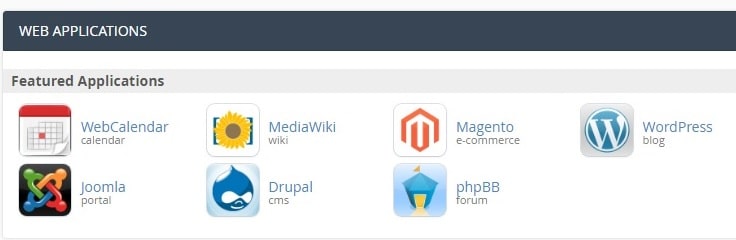
Step 5: Under “Web Applications” click on “WordPress” icon

Step 6: Now click on “install this application” button.

Step 7: Select domain and add basic details.

Step 8: Click on install.

Step 9: Login to admin panel.

Now we discuss the steps one by one in full details.

Step by Step Guide on How to install WordPress in Godaddy cPanel

Step 1: Purchase Hosting and domain name from Godaddy if you haven’t purchased yet. (You can also use Godaddy Coupon Code to get discount).

Step 2: After Purchasing domain and hosting you can login to your account.

Step 3: Under “My Products” find the “Web Hosting” and click on “Manage” button.

Wordpress in Godaddy

Step 4: In next step click on “cPanel Admin” button. It will redirect you to cPanel.

Godaddy cPanel

Step 5: Inside cPanel you will find the “Web Application” tab where you can click on “WordPress” application.

cPanel WordPress Godaddy

Step 6: Once you click on WordPress it will redirect you to installation page. Here you can click on “install this application” button.

Installing WordPress

Step 7: In next step it will ask you to select domain name on which you want to connect WordPress, version, Language, Administrator username, password, Email, Website title, Website tagline and other details as shown below.

Godaddy Select Domain


Godaddy WordPress Admin Settings

Step 8: Finally click on install button at the last to complete the WordPress installation process.

installation in Progress

Step 9:  Login to Admin panel using credentials that you used at the time of installation.

Related Post

Hostinger WordPress Hosting Review

LiquidWeb Managed WordPress Hosting – Price | Comparison

Leave a Reply Cancel reply

Your email address will not be published. Required fields are marked *

*
*

Recent Posts

  • Time4VPS Review – Cheap VPS Hosting Server
  • DatabaseMart Review – In Depth Review by Expert
  • GoViralHost Review 2024
  • Email Marketing Tactics To Boost Conversion Rate
  • Hosting24 Review
Get a 70% discount on Shared, WordPress Hosting, and Reseller Hosting. On top of that, you get a free domain registration for one year.

Popular Stores

  • Atlas VPN Coupon
  • AWeber
  • Bigrock
  • Bluehost
  • ChemiCloud
  • CloudWays
  • Constant Contact
  • ConvertKit
  • DatabaseMart
  • DigitalOcean
  • Dreamhost
  • Flaunt7
  • G Suite
  • GetResponse
  • GoViralHost
  • Hostgator India
  • Hosting24
  • Hostinger
  • Hostinger India
  • HostingRaja
  • Hostkarle
  • HostNOC
  • HostSailor
  • Liquid Web
  • Moosend
  • Nexcess
  • NordVPN
  • Reseller Club
  • SmarterASP.Net
  • Stablehost
  • Time4VPS
  • Verpex
  • Webdock
  • WPX Hosting
  • Zyro

Popular Coupon Categories

  • Black Friday Hosting
  • Cloud Hosting
  • Dedicated Hosting
  • Domain Names
  • Email Marketing
  • Hot Deals
  • Joomla Hosting
  • Linux Hosting
  • Magento Hosting
  • Online Store
  • PrestaShop Hosting
  • Reseller Hosting
  • SSL Certificate
  • VPN
  • VPS Hosting
  • Web Hosting
  • Website Builder
  • Windows Hosting
  • Wordpress Hosting
DMCA.com Protection Status

Site Links

  • Affiliate Disclosure
  • Sitemap
  • Blog News

Get Help

  • How to Use
  • Contact Us
  • Discount Guide

Copyright © 2025 JK Coupons. All Rights Reserved.